Jun 1, 2019

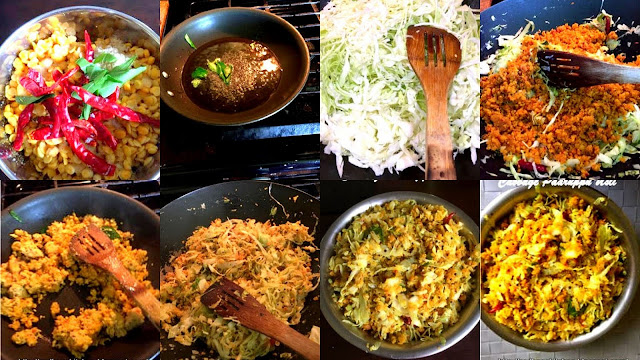
Paruppu Usli with Cabbage (CABBAGE AND DAL CRUMBLE)


Paruppu Usli is a traditional South Indian curry, particularly famous in South India. This is a healthy dish prepared using lentils and vegetables. One of the best way to get more protein and fresh vegetables and manage to eat healthy. Each family has a different way of preparing this, the amount of lentils is also not fixed. Some like more lentils, whereas some like more vegetables.
Cabbage Paruppu Usli........is quite a rare Paruppu Usli, which normally people don't make. because, they are scared, if they add cabbage, the Usli might become soggy. Try this recipe and give me back your feedback. Enjoy

Recipe Category :         Vegetable Dry Subzis
Recipe Cuisine  :            South Indian
Soaking Time    :            30 Minutes
Cooking Time:                20  Minutes
Serves             :              3-4 People

Ingredients:
Chopped Cabbage             2 cups
Curry leaves                           2 Springs
Turmeric Powder                   ½ Teaspoon
 Salt                                          To Taste

For Soaking:
Tovar Dal                              ½ cup
Chenna Dal                          ½ cup
Urdh dhal                              1 Tablespoon
Moong dhal                          1 Tablespoon
Red chillies                             6 no

For Tempering
Oil                                           4 Tablespoon
Mustard seeds                      ½ Teaspoon
Urdh dal                                1 Teaspoon

Method

  • Wash the dals and soak along with red chilies for 30 minutes in hot water.
  • Drain it and grind Coarsely with salt, Hing and  curry leaves. Do not add water while grinding.
  • Spread the paste on a shallow greased plate (or use idli steamer plates) and steam for 7 minutes or so. If using a pressure cooker to steam the paste, do not use the weight.
  • Cool the Usli cakes completely, by breaking them into two or three pieces.
  • Pulse it in the Blender jar, so that it becomes a fine powder. Keep aside.
  • Heat the Oil in a pan, splutter with mustard seeds and urad dal. After the mustard seeds splutter, add the pulsed Usli mixture. Gently roast it in slow fire. Keep aside.
  • In the meantime, in another pan, heat a  very little oil, add cabbage and salt, and cover until it is cooked. Keep stirring occasionally.
  • When cabbage will get cooked and the roasted dal mixture and mix it well.
  • Sauté for another 5 minutes in simmer flame.
  • The cabbage Usli is ready to serve.
  • Serve with Morekuzhambu and Rice


Please see my other Paruppu Uslis Here:


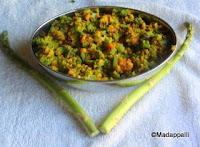
KOTHAVARANGAI(Cluster Beans) PARUPPU USILI


May 1, 2019

Coconut Milk Pulao / Thengai Pal Sadham


HI Friends, this week I bring to your kitchen a very flavorful rice recipe. Coconut milk Pulao is a well-known dish. The coconut aroma and flavor along with the fragrant spices does make this pulao different from the regular. This dish which is very mild with sweetish flavor & is accompanied with a side dish to make it complete. I’ll quickly whip up a mixed veggie Raita and call it day – no other sides needed! Try this for your next dinner party and watch your guests swoon over the aroma and flavor.

How to make Coconut milk pulao
   
Cuisine     :                   Kerala
Preparation Time           5 Minutes
Soaking Time                20 Minutes
Cooking Time                20 Minutes
Servings                       4 nos

Ingredients:

Basmati Rice                 2 Cups
Ghee                            2 Table spoons
Coconut Milk                 2 cups
Water                          ½  cup
Turmeric  Powder          ½ Teaspoon
Salt                              To Taste
  
To Temper

Ghee                           2 Table spoons
Bay Leaves                  1 no.
Cinnamon sticks           1 nos.
Cardamom                   3 no.
Cloves                         4 nos.
Star  Anise                  1 nos

To Be Grind:

Mint Leaves                 20 nos.
Coriander Leaves         1 bunch
Green Chilies               5 no.
Grated Ginger              1 Tablespoon.

For Garnish
Fried Cashew nuts        2 Tablespoon
Fried Raisins                2 Tablespoon
Few Chopped Mint and Coriander leaves

Method:
  •  Wash and Soak Basmati rice for 15 minutes. After 15 minutes drain the water and keep aside.
  • Grind together Mint leaves, Coriander leaves,  green chillies and grated Ginger. Keep aside.
  • Take a pressure cooker and add Ghee. When ghee is warm, add the spices -  Bay Leaves,Cinnamon, cloves , Green cardamom and star anise.. Fry for 30 seconds.

  • Then add the  rice , saute for 2 minutes . Then add the grinded masala paste and again saute it for 2 minutes, Make sure it doesn't stick to the bottom.
  • Now add the Coconut Milk , water, Turmeric powder  and salt. Mix it well.

  • When the water comes to boil close the pressure cooker and cook for 15 minutes on a low flame.
  • Open the lid and  mix it gently, without  breaking the rice  using fork.
  • Garnish with fried cashews, raisins and  Coriander& Mint leaves.
  • Serve hot with Raita.

Notes:  
  • Here I used tinned coconut milk. Instead of tinned coconut milk, you can use freshly ground coconut milk.
  • Use the Branded Basmati Rice. If you use old Basmati rice,  add 1:2 water. If you use new basmati rice add 1: 1 ½ water.


Coconut Milk Rice

Apr 1, 2019

Raw Turmeric and Manga Inji Pickle/ How to make Fresh Ginger Turmeric Pickle


Turmeric is the best medicine in Ayurveda. It cures the whole person. Turmeric is pungent, bitter, astringent and heating and has a pungent vipaka.. As you all know it is needless to say about the goodness of turmeric and Ginger

This Fresh Turmeric and Ginger Pickle can be made only when the ingredients are in season, but when they make their appearance in the market, almost every household whips up a batch of this pickle as it is not only tasty but also good for health. When I saw Kacchi Mango Ginger and Turmeric Root in the market I decided to buy it and make a pickle out of it.

Fat Free ,Gluten free, High Fiber, Low Calorie, Sugar Free
  
Recipe Category :      Pickle
Cooking Time      :       0 minutes
Preparation Time :      20 Minutes
Makes                    :     1 ½ cups
Storage Time        :     Up to 1 Week

 Ingredients:

Fresh Turmeric
250 gms
Fresh mango Ginger
250 gms
Fresh Tender Ginger
50 Gms
Green chillies
6 Nos.
Lemon Juice     
1 Tablespoon

Lemons
2 Nos
Organic Himalayan salt
2 Tablespoon or to Taste (can use sea salt or rock salt)

To Be Grind

Mustard Seeds     
1 Teaspoon

Fennel Seeds         


1 Tablespoon


Method:
  
  • Wash & Rinse the Turmeric, Ginger and Green Chillies and wipe well with a kitchen towel, so that no moisture is left.

  • Scrape away the skin and cut into thin round slices.
  • Cut the Lemons into small pieces.

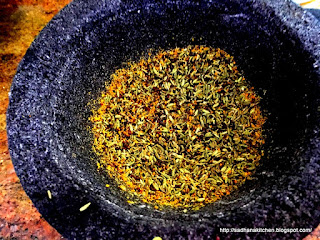
  • In a mortar add Mustard & Fennel Seeds and using a pestle grind gently.


  • Add  all the  chopped pieces to a big vessel.

  • Add salt and  Mustard mixture to the Chopped pieces. Mix well.
  • Now find an area with direct sunlight and let the vessel sit under the strong rays for at least 4 to 6 hours. you can cover the top with one of those lids with a fine mesh which we use to cover fruit.
  • Once the mixture has had enough sun , store it to the sterilized Glass Bottle.

  • Now you can keep this Haldi Adrak Mirch Achar  in the Refrigerator for  2 days, and then start using Haldi Adrak Mirch Achar thereafter.
  • Serve with Curd Rice, Chapati  and Kanchi. 


Mar 1, 2019

Cheera Thoran/ How to make Kerala Style Amaranth Leaves Stir Fry


Amaranth Leaves (Mulai Keerai) Stir Fry is a healthy iron, vitamins and minerals packed stir fry. Its a simple side dish that can be served with steamed rice. The duo makes a perfect combo and you need no extra curries with it. Do try if you get hold of these leaves and enjoy making it at home!  . Here comes My recipe:

Preparation Time:       15 Minutes
Cooking Time      :      10 Minutes
Recipe Category :        Kerala
Serves              :         4

Ingredients:

Amarnath Leaves         
1 Large Bunch
                               
Salt  
To Taste
Coconut Oil
2 Table Spoon

To Be Grind

Grated Coconut            
¾ Cup
Green Chillies                
2 Nos
Cumin Seeds                     
½ Teaspoon

Red Chili Powder              
¼ Teaspoon

Turmeric Powder             
¼ Teaspoon


For Seasoning:

Coconut Oil           
1 Teaspoon

Mustard Seeds      
½ Teaspoon

Broken Red chillies   
2 Nos


How To Make Cheera Thoran? Here You Go

  • Wash the Amarnath leaves thoroughly, remove the hard stalk, sort the leaves and chop it.

  • In a blender  put the all above Grinding ingredients and Grind Coarsely.
  • Place a nonstick pan on medium heat and add  2 Tablespoon of Coconut Oil , Add the all seasonings and fry for a minute.

  • Now add the ground Coconut Paste and add a pinch of salt. Reduce the stove heat to simmer.

  • Fry the paste till  raw smells goes away.
  • Now add the chopped Green Leaves. Add a salt and one teaspoon of coconut oil. Mix  it well.
  • Cover the Pan and cook it for 3 to 4 minutes ,stir occasionally. Then open and stir well until the water goes .


  • Dry out any moisture left and the stir fry is ready to be served with rice.


Enjoy!!!

.

Feb 1, 2019

Bombay Pav Buns/ Dinner Rolls/ Home made Buns


I’m here today to share Eggless Pav Bread Buns Recipe. Nothing makes a Homemade Pavs/Buns special quite like dinner rolls. You can make Pavs from your favorite bread mix. Soft Pavs/Dinner Rolls are usually a little richer than bread recipes with more sugar and fat than corresponding bread recipes. This feather-soft bun is best had with a spicy bhaji or vegetable curry, but you can also serve it as a sandwich lined with chutney and packed with potato vadas.

Preparation Time:     1 ½ hours
Baking Time:             20-25 Minutes
Serves       :               8 to 10 Pavs        

Ingredients:
All Purpose Flour/ Maida               2 cups
Organic Sugar                             1 Tablespoon
Salt                                            ½ Teaspoon
Melting Butter /Oil                        2 Tablespoons
Extra flour for kneading the dough
           
For Proofing Yeast:
Warm Milk                                   ¾- 1 Cup
Sugar                                          1 Tablespoon
Instant Active Dry Yeast                1 Tablespoon

Other Ingredients:
Milk for brushing
Butter for brushing
Extra Butter and flour for greasing and dusting the pan

Method:

Proofing yeast:
  • Warm milk in a bowl, add sugar and then yeast. Mix well and keep in a warm place for 10 to 15 minutes till it becomes frothy

 Making Dough
  • In a bowl add all-purpose flour and a little salt and sugar.
  • Mix and make a well in the center of the flour.
  • Add the yeast mixture to the well.
  • Add butter (or Oil) and knead it for 10 Minutes.
  • Once kneaded, insert the fingertip into the dough and it should bounce back clean, which means the dough is ready.
  • Add the oil-butter mixture. Knead again for 5 to 8 minutes by stretching the dough and folding it back till it is smooth and elastic

  • Now transfer the dough to a big bowl, cover and keep aside in a warm place about one hour (or more depending on your climatic conditions).

  • The dough will rise and double or even triple in volume.
  • Once the dough has risen, remove it from the bowl and knead it for another 2-3 minutes. This step is important for lighter pavs.
  • Divide the dough into 12 equal portions. Roll each portion of the dough into a smooth round.
  • Grease a cake tin with oil and place the shaped dough balls. Now cover the tin with damp cloth or a plastic wrap and keep aside for another half an hour (or a little more) till they rise.
  • Remove the damp cloth after 30 minutes, you will see that the pavs have risen.

  • Brush the dough with the milk.

Baking Pavs:
  • Bake it in a pre-heated oven at 200°c (400°f
  • Place the cake tin in the oven and bake pavs for 20 Minutes.
  • The pavs should evenly brown from top.
  • Turn off the oven and remove the pavs.
  • Once cooled, de-mould it and brush the Pavs with butter and cool completely.
  • ENJOY with Pav Bhaji.!!
  • Store pavs in a zip lock bag or airtight box to prevent them from drying. They are good to go for 2 to 3 days. You can also refrigerate them for a week or more.


Jan 1, 2019

Shankarpali


Shankarpali is famous Maharashtrian sweet made during Diwali festival. It is rich in carbohydrates, making it an instant source of energy. It has simple recipe and results in scrummy munch sweet snacks that can be prepared in advance and stored for approx 3 weeks.

Ingredients

All Purpose Flour (Maida)         3 cups
Powdered sugar                      1- 1¼ cup
Rava (Semolina)                      1 cup
Oil/Ghee/ Vegetable fat            1/2 cup
Cooking oil                              for deep frying
Cardamom powder                    ½ Tsp.
Salt                                          a pinch.

 Method:

  • Take a big bowl and add all-purpose flour, rava , powdered sugar,cardamom powder and salt .
  • Now add the melted ghee or oil .Mix into a crumbling mixture with hands.
  • Now knead this crumbling mixture into smooth dough adding water little by little as required.    Keep kneading the dough for about 15 minutes with pressure.
  • Keep this dough covered with damp cloth for 10 min.
  • Divide this dough in 3 large balls. Take one ball, round it smooth, flatten and roll out into large thin (not very thin but thin) circle.
  • Cut rolled out dough into strips vertically, and then again horizontally, making about an inch sized strips. Separate those cuts on a plate.
  • Heat oil in a kadai once the oil is hot add the shankarpali to it ensuring gas is on low flame. Once the shankarpali are nice golden brown remove them. Repeat the same procedure with the remaining of the dough.
  • Once its fried allow them to come to room temperature.
  • Store them into an airtight container. This should last for about 3 weeks,that is if you resist them that long!
  • Enjoy crunchy munchy-soft sweet bites with hot coffee/tea.


Beetroot Masala

Beetroot is a very good healthy vegetable especially for increasing the HB count. It also helps to prevent macular degeneration, ...